Since finishing the X-15A-2 I’ve been going through my stash looking to see what I might build next. I remember mentioning the Pegasus ‘Have Blue’ kit while talking about the shortcomings of the short run Special Hobby X-15A-2. I admitted that I have started and stopped working on the kit several times over the years since buying it. This one also is a short run kit. It was first produced back in 1992 and, if I remember correctly, I bought my copy from a local hobby shop back in 1996. Comparing the Special Hobby kit to the Pegasus kit is like comparing a Revel kit to Special Hobby. The Special Hobby kit is much more sophisticated. By contrast the Pegasus kit is very rough and there are some inaccuracies and many fit problems. It is, however, one of only three kits of the subject that have ever been released. They are all three hard to find now. So, I’ve decided that it’s about time that I finally build this one, warts and all.
Nailing down some of the plane’s details is compounded by the fact that there are so few photographic or diagrammatic images of it. To date I’ve only found seven pictures of it. It doesn’t help that a lot of information about the aircraft is still classified even though the plane was built back in the 1970’s. It also doesn’t help that neither of the planes that were built survived. They both suffered crashes. At any rate let’s get on to the build.

Above is the art work on the box. It shows a the first of the aircraft, Lockheed SN HB1001. It had a nose boom for some of the initial research on its flight characteristics. The second plane, SN HB1002 did not have the nose boom and was painted an overall gray. The planes never had any identifying lettering or marks on them. The only mark on the outside was a red triangular ejection seat warning stencil. They never received an Air Force serial number either.
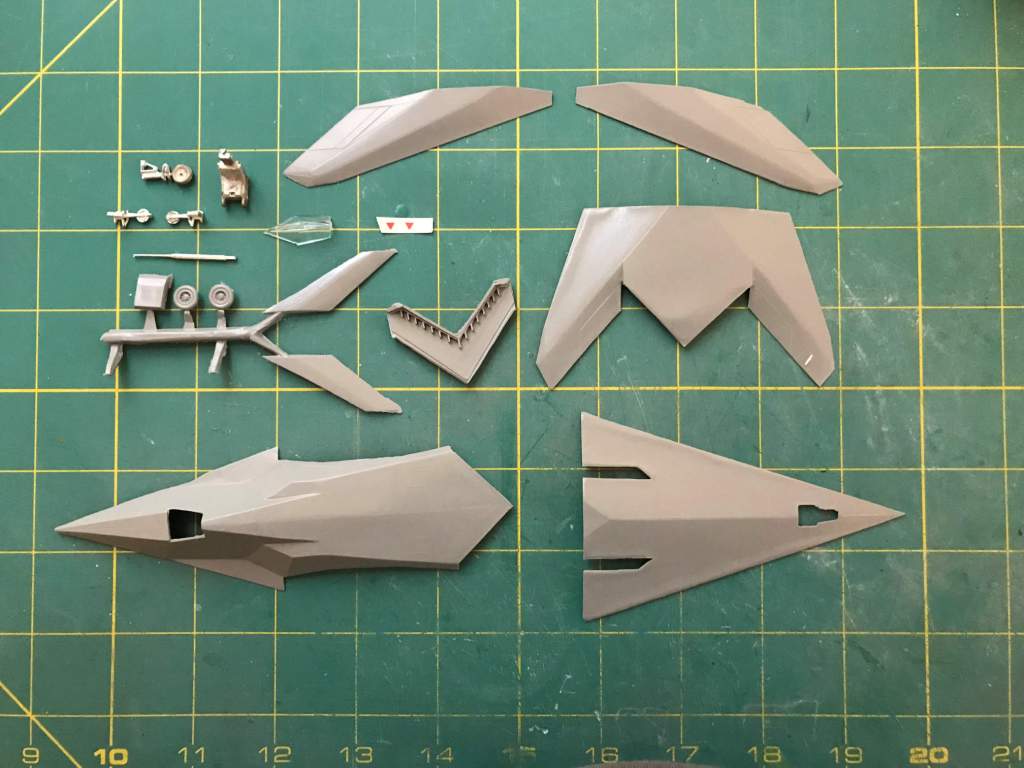
Here is a look at the contents of the kit. It contains 11 injection molded gray styrene parts, one clear part, and four white metal parts. The white metal parts are for the landing gear, nose boom, and ejection seat. It also includes a small decal sheet with the two ejection seat warning stencils.

Inside the the two main fuselage parts there were some engravings from the mold showing the dates the molds were created.
A test fit of the canopy showed that there would need to be some shimming and filing of the mating surfaces for a good fit. The picture below shows where I drew some pencil lines to indicate where some shims are needed for the front of the canopy. It also has a line where I need to remove some plastic on the side of the cockpit for a good fit.

You can also see that the wing on the left will have to be filled when I glue the fuselage halves together. It appears that the mold did not get fully injected with plastic.
I will be using landing gear from an F-5 Tiger kit. The way the provided white metal mains were molded will prevent them from fitting into the landing gear bay slots, even after I widen the slots. The openings are too narrow even if I used the kit parts. The F-5 nose gear is a bit larger than the kit provided gear, even so I’ll go with the donor gear from the F-5.

The back half of the lower fuselage has already had the exhaust diffuser glued into place. You can also make out how rough the molding is. When the parts are put together there will be a fair amount of filling and sanding required to get a smooth finish.
After some further research I found that the nose gear cutout is quite wrong. I had to do some reshaping and I needed to add some styrene strips to get rid of the too large rear part of the opening. Also, the main gear wheel wells did not have a triangular forward shape. They were simple rectangles so some bits of sheet stock were added to square them up. You can also see in the above photo a small gap where the diffuser and wing meet. I will add some styrene strip to fill that in.

Note in the above photo that all three gear openings have been slightly enlarged to match the size of the F-5 gear. Next I glued the rear half of the lower fuselage to the front half.

With the lower halves glued together it was time to add the wheel wells. I built them from .015 sheet stock and a bit of .015 x .020 strip.
You might also have noticed that I placed a rectangular piece of sheet stock along the center of the lower fuselage. This is to provide a level base to glue the ejection seat. You might also notice that compared to the previous photos that the front tip of the lower fuselage is shorter. I snapped it off while constructing the landing gear bays. After the upper and lower fuselage halves are glued together I’ll use some putty to fill the area and sand it to shape.
Well that is it for now. Thanks for following along and look for more updates to come.


One thought on “Pegasus 1/72 Lockheed XST (Have Blue) Build”